26th/apr/2026 Scenery Techniques for a Realistic Mountains and Valley Railroad, and Rock Cuts in N Scale
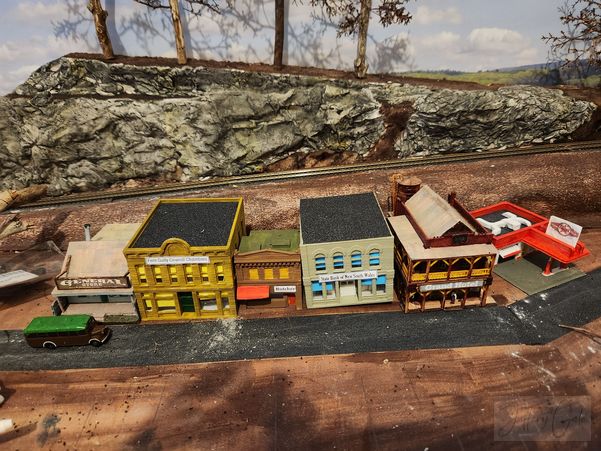
Realistic mountain and valley railroad scenery in N scale is a balancing act. You need bold landforms that read clearly from a normal viewing distance, but you also need fine textures and believable geologic logic so the scene feels “right.” Mountains should have weight and structure, valleys should show how water and gravity shaped them, and rock cuts should look like they were blasted or carved through real strata. The techniques below focus on repeatable methods that work on small footprints, photograph well, and hold up to close inspection on a layout like Mountain and Valley N Scale Railroad.
Before you start, set a simple goal for each scene. Decide what your viewer should notice first, for example, a tall ridge line, a deep creek valley, a dramatic highway rock cut, or a tunnel portal tucked into a cliff. When you know the “hero” feature, you can support it with believable transitions, correct colour temperature, and consistent vegetation patterns. Use the tips below as a checklist as you plan, then build in layers from big shapes to small details.
Top 11 Scenery Techniques for Realistic Mountains, Valleys, and Rock Cuts in N Scale
- 1) Build believable landforms with stacked contours, not random lumps
Mountains in the real world are the result of uplift, erosion, and time. In model form, the fastest route to “toy mountain” is a smooth, rounded mound that has no logic. A better method is to build landforms as stacked contour layers. Each layer represents a change in slope or a bench where harder rock resisted erosion. This creates natural-looking terraces, shoulders, and breaks in the hillside that catch light and shadow.
In N scale, the contour method also helps you control proportions. If you want steep slopes, keep each contour step narrow and increment the height quickly. If you want rolling foothills, widen the steps and use smaller vertical changes. You can make these layers from foam insulation board, scrap foam, cardboard strips, or even lightweight wood profiles. Adhesive is important; use foam safe construction adhesive or hot glue where appropriate, and pin layers temporarily while they set.
After stacking contours, blend them into a continuous surface. Plaster cloth, Sculptamold, lightweight spackle, or a paper towel dipped in diluted plaster all work. The key is to preserve some of the contour breaks. Do not smear everything into a featureless dome. Let certain shelves and ridges remain. Those shelves become realistic ledges for talus, shrubs, and trees, and they provide places where a rock cut can intersect a hillside without looking pasted on.
Practical proportion tip: N scale compresses depth quickly. A mountain that is only a few inches deep can still look massive if the slope angle and ridge line are bold. Add a sharp ridge crest and a couple of secondary spurs that run toward the tracks, then carve small gullies between them. Those gullies are what sell the scale.
- 2) Plan striations and strata so rock looks geologically consistent
Rock faces look convincing when the layers and fractures make sense across a scene. The most common mistake in rock cuts is using one rock mold, one time, with no alignment. The result is a patchwork of unrelated textures. Instead, decide what kind of rock your railroad runs through, then make a few simple rules for yourself, such as “strata beds run roughly level,” or “vertical joint lines dominate,” or “the area is folded, so strata tilt at 20 degrees.” You do not need a geology degree. You just need consistency.
If you use commercial rock moulds, rotate and flip them, but keep the bedding direction consistent. For sedimentary rock, align the horizontal bands and let them continue around corners. For fractured granite, focus on blocky shapes and vertical cracks, and avoid too many obvious horizontal band lines. For slate or schist, exaggerate thin layers and let them shear diagonally. For volcanic basalt, introduce column-like fractures or chunky, broken textures with minimal bedding.
When creating a rock cut, carry the same rock language into nearby outcrops. A cliff above a tunnel portal should share textures and bedding angles with a smaller outcrop 6 inches away. This continuity makes the entire mountain seem carved from one mass of stone instead of being assembled from parts.
Simple field reference helps. Look up photos of a real rail cut in a region similar to your theme, then copy two or three key features. Examples include a cap of soil over rock, a softer layer that has eroded into a recess, or a diagonal joint set that creates wedge-shaped blocks. Adding one of these recognisable patterns is often more effective than adding more random detail.
- 3) Combine carving and casting for rock cuts that have sharp edges and natural transitions
Cast rock moulds are excellent for texture, but carved foam is excellent for big shapes and crisp edges. Pair them. For the basic cut, carve the overall form in foam so the rock face has the right angle and shape relative to the right of way. Rock cuts often have a steeper lower face and a slightly broken, weathered upper section. Carve that profile first, then add moulded castings only where the texture needs to be strongest.
Use castings as “panels” embedded into a carved surface, rather than the entire surface being only castings. This allows you to control the composition: place larger, more dramatic textures near the viewer, and quieter textures farther back. Blend seams with lightweight patching compound or Sculptamold, then restamp small pieces of texture using a broken casting, a crumpled foil ball, or a stiff brush. This hides borders and keeps the rock face from looking like a tiled bathroom wall.
For sharp ledges and undercuts, carve them. Foam lets you cut crisp edges and recesses that are hard to achieve with flat castings. Use a hobby knife, breakaway blades, or a hot wire cutter, then roughen surfaces with a wire brush. For rock fall areas, gouge pockets and create cavities for talus. In N scale, subtle undercuts read well under layout lighting and add dimensionality in photographs.
The best rock cuts show a transition to soil and vegetation near the top. Do not stop the rock abruptly at a perfectly level line. Real cuts have broken rock, thin soil, roots, and grime. Feather the rock texture into a gritty surface using fine sand, sifted dirt, and small talus glued in place. Then plant short grass and low shrubs that look like pioneer growth on disturbed ground.
- 4) Use talus and debris fields to connect cliffs to valleys
Talus is one of the most powerful realism tools because it explains how rock faces weather. At the base of a cliff or rock cut, you should often see a slope of broken stone, smaller pieces near the bottom and larger pieces closer to the source, or the reverse depending on local processes. On a man made rock cut, talus often gathers on benches, behind drainage ditches, or in pockets where maintenance is difficult.
In N scale, talus must be very fine to stay believable. Many modellers use ballast that is too large, which makes rockfall look like boulders the size of cars. Mix several grades: fine sand, small grit, and a small amount of slightly larger stone for variety. Real talus has a range, but most of it is small. If you want a standout boulder, place one or two intentionally and seat them into the slope so they look heavy.
Colour matters. Use a talus mix that matches your rock type. If your cliffs are cool grey, keep debris cool grey. If your rock has warm tan highlights, tint the talus with similar tones. You can stain real stone chips with acrylic washes or use multiple commercial scenic stones blended together. Lock everything down with matte medium or diluted white glue with a wetting agent. When dry, add a thin dark wash in crevices to restore depth, then dry brush highlights lightly on the most exposed edges.
Talus is also your transition tool between geology and vegetation. Where the slope becomes stable, sprinkle fine dirt and plant grasses. Where it stays unstable, limit vegetation to a few hardy bushes. This gradual change makes your cliff feel integrated with the valley floor instead of sitting on top of it.
- 5) Sculpt erosion patterns, gullies, and drainage logic first, then apply surface texture
Valleys and cut slopes are shaped by water. If you add erosion after everything is already textured, it often looks like you scratched lines into a finished mountain. Instead, carve drainage patterns into your base landform early. You do not need many. Two or three main gullies that branch into smaller rills are enough to imply a larger watershed beyond the backdrop.
Start at the ridge and work downward. Erosion channels typically widen and merge as they descend. Reserve flatter areas where water could meander and deposit sediment, especially near streams, culverts, or the valley bottom. Where the slope is steep, carve V-shaped channels. Where the slope is gentler, carve broader U-shaped swales. This is a simple rule that produces big realism gains.
Once the channels are carved, reinforce them during plastering by not filling them in. Let plaster cloth drape into the gullies, then add a thin skim coat. After it sets, deepen certain lines with a sculpting tool, and roughen the interior. Later, when you add ground cover, use darker soil colours in the channels and place fine rock and leaf litter where runoff would concentrate. A few small fallen logs or branches positioned across a gully can also sell the scale, because they show how water moves debris downhill.
In rock cuts, apply drainage logic too. Add small weep stains, a narrow channel where water runs along the base, or a concrete or riprap ditch if your prototype would have one. Even if you do not model the entire drainage system, just suggesting it will make the scene feel engineered and maintained.
- 6) Paint rock with layered stains, not one coat, to achieve depth in N scale
Real rock is rarely one colour. It has mineral variation, water staining, shadows, dust, and biological growth. In N scale, a single flat paint colour kills texture and makes castings look like plastic. The fix is layered staining. Start with a dark base wash to define cracks and recesses, then build mid-tones, then add subtle highlights and localised stains.
A reliable sequence is: prime or seal plaster, apply a dark grey or dark brown wash, then add thin washes of your main rock colours. For many mountain settings, a mix of charcoal, raw umber, and a touch of green works well. For sandstone areas, add warm tan and light grey. Let capillary action do the work. You want the wash to flow into crevices and dry lighter on raised surfaces.
After washing, dry brush sparingly. Use a light grey, off-white, or warm buff, depending on rock type, and just kiss the edges. Dry brushing is easy to overdo, especially in N scale. If highlights are too strong, tone them down with a final very thin wash that ties everything together.
Do not forget vertical staining. Water creates streaks below cracks and ledges. Add thin, downward streaks using heavily diluted black or dark brown. Then add a few lighter mineral streaks, like a pale tan or faint white, for mineral deposits. Keep streaks narrow, not wide bands. For wet areas near streams, add darker tones low on the rock face and a subtle green tint where algae might grow.
- 7) Create convincing soil layers and ground texture using real dirt and scale-appropriate grit
Mountains and valleys are not only rock. Soil is the believable layer that ties everything together, especially on slopes where vegetation takes hold. Using real dirt, properly prepared, is one of the most effective ways to get a natural texture in N scale because it contains a range of particle sizes that read as earth when scaled down.
Collect dirt from a clean location, dry it, then sift it through fine screens. Bake it lightly or otherwise sterilise it if you are concerned about organic material. Keep multiple grades: very fine dust for topsoil, slightly coarser for rough ground, and a small amount of grit for disturbed areas. Apply dirt over a painted base so any thin spots still look earthy. Use matte medium or diluted glue, and mist with a wetting agent so it soaks in without beading.
Build soil in layers. On many real slopes, you see a thin top layer of darker soil over a lighter subsoil, and then rock. You can suggest this just with colour placement: darker browns in flatter zones where organic material collects, lighter tans on exposed slopes, and grey where rock is near the surface. On cut banks, show a vertical face with a darker cap, then a lighter interior, then scattered stones at the base.
Texture variety is critical. Combine fine dirt with small talus, leaf litter, and fine turf. In N scale, leaf litter should be extremely fine. Crushed dried leaves ground into dust can work, or use commercial leaf products meant for smaller scales. Place it under trees, in hollows, and in drainage lines where debris collects.
- 8) Use vegetation in ecological zones, not evenly everywhere
Even if your tree-making skills are excellent, an evenly green mountain looks artificial. Real landscapes have zones controlled by moisture, soil depth, sun, wind, and disturbance. On a mountain and valley theme, you can create a lot of realism by simply placing vegetation where it makes sense, and leaving other places sparse.
Start with three vegetation tiers: ground cover, shrubs, and trees. Then place them based on stability. Steep rock slopes get little to no ground cover, just a few hardy plants in cracks. Talus slopes get scattered low shrubs and patches of grass where fines accumulate. Stable soil slopes get fuller grass and more shrubs. Valley bottoms and areas near streams get the lushest growth, including taller grasses, bushes, and dense tree clusters.
Edge conditions matter. Along a rock cut, vegetation typically colonises from the top down and from any ledges outward. So, place denser grass at the top lip, then let it thin as it approaches the bare rock face. Add a few hanging vines or small shrubs rooted in cracks, but keep them modest so the rock remains the star. Along trackside, maintain a “railroad maintained” strip if your era and prototype call for it, such as mowed or chemically treated areas with lower growth.
Colour variation is part of zoning. Use multiple greens, plus faded yellow green for dry slopes, deeper green for moist areas, and some brown for dead material. In N scale, very bright green turf can look like felt. Knock it down with a dusting of earth tone ground foam or a mist of very thin tan or grey paint from a distance, applied lightly so you do not glue the fibres flat.
- 9) Make trees that match the landform, and plant them to show terrain shape
Trees are often the dominant vertical element in mountain scenes. In N scale, tree size and placement can either sell depth or destroy it. Use a range of heights and density. Taller trees belong in valley bottoms and protected slopes, while higher elevations or wind-exposed ridges have shorter, sparser trees. Even if your prototype is heavily forested, ridges often show gaps, rock, and stunted growth.
To emphasise terrain, plant trees to reveal contours rather than hide everything. A classic trick is to keep the ridge crest more open, so the silhouette of the mountain reads clearly. Then thicken the forest in bowls and hollows where moisture collects. On spurs that run toward the viewer, plant tree lines along the spine but leave small clearings on the sides to show the slope dropping away.
Tree trunks matter more than many modellers expect. Where trees are near the front edge, include visible trunks and slight colour variation. A few dead snags add realism, especially near rock cuts or on disturbed slopes. For deep forest areas farther back, you can use simpler armatures or even tree mats, but vary the colour to avoid a flat carpet look.
For depth, use forced perspective. Keep the largest, most detailed trees in the foreground. Use smaller trees as you approach the backdrop, and reduce contrast and saturation slightly. This simulates atmospheric perspective and makes your valley look deeper than it is. If you have a painted backdrop, match the tree colour temperature so the transition is not abrupt.
- 10) Model water-shaped valleys with realistic streambeds, banks, and floodplain details
A valley often includes a creek or river, even if it is a small one. Water features instantly communicate topography because they sit at the lowest point and define the drainage direction. The key is to treat the stream as a bed with banks, not as a shiny strip poured into a trench.
Start by shaping the channel. A real stream rarely runs perfectly straight for long. Add gentle curves, small pools, and slight changes in width. Create undercut banks on outside bends and gravel bars on inside bends. In N scale, gravel bars should be made of very fine sand and small grit, with a slightly lighter colour than the surrounding soil. Place a few larger stones where flow would concentrate, such as at the head of a pool or near a constriction.
Paint the streambed before pouring water material. Use darker tones in deeper areas, lighter tones on shallows and bars. Add subtle green or brown tinting where algae and silt appear. Then choose a water product that fits your method, such as two-part resin, UV resin, acrylic water, or gloss medium layers. Avoid thick single pours if your channel is shallow, because it can look like a block of glass. Multiple thin layers often look better and reduce bubble risk.
Finish with surface texture. Most moving mountain streams are not a mirror. Add ripples with gloss gel or a stippled clear medium. Create small whitewater highlights at rocks, but apply sparingly. Too much white makes it look like a cartoon. Add streamside details like driftwood, leaf litter, reeds, and wet soil staining. A fine dark line at the water edge, like a damp soil band, helps define the shoreline and makes the pour look integrated.
- 11) Weather rock cuts and cliffs with human and nature effects, then unify with dusting
Rock cuts on a railroad are both natural and maintained. They show blast marks, drill holes, staining from diesel exhaust, dust from passing trains, and occasional stabilisation efforts like netting, bolts, or shotcrete patches. Even if you model none of the hardware, you can create the impression of a working railroad by adding targeted weathering.
Start with blast and tool marks. For a blasted cut, add slight scalloping and fractured edges instead of smooth faces. If you want to suggest drill patterns, place a few tiny aligned holes in a small area, not across the whole cut. The effect should be subtle in N scale. Then add grime where it would accumulate, such as beneath overhangs, under culvert outlets, and along the base near a ditch line.
Next, add biological and mineral effects. Use greenish stains in damp zones, dark streaks below cracks, and tan or white mineral deposits where water seeps. On sun-exposed faces, keep colour drier and lighter. On north-facing or shaded faces, push cooler and darker. This directional thinking makes your scene respond to imaginary sunlight, which photographs extremely well.
Finally, unify different textures and materials with a light dusting layer. Real landscapes collect dust and fine soil. On a layout, different products can look too separate: foam, plaster, sand, and castings can each have their own sheen and colour. A very light mist of heavily diluted earth tone paint, or a gentle application of weathering powders fixed in place, can tie everything together. Focus this unifying dust where trains and maintenance traffic would kick it up, such as near the track, on lower rock faces, and on the first few feet of vegetation. Keep upper slopes cleaner so the gradient feels natural.
Putting it all together, a simple build order that works
To apply these techniques efficiently, work in layers: shape the land with contours, carve drainage, define rock zones, add castings and carved details, then paint rock with washes. Next, add talus and soil, then ground cover, then shrubs and trees, and finally water and weathering. If you do this in a consistent order, you will avoid the common trap of trying to “fix” realism at the end with extra foliage or random paint. The realism comes from structure first, then texture, then colour, then life.
Checklist for a quick realism audit
- Does the mountain have a clear ridge line and a few secondary spurs?
- Do erosion lines connect from high ground to the valley bottom?
- Do rock strata directions match across adjacent outcrops?
- Is there talus or broken rock where you would expect it?
- Does vegetation change with slope, moisture, and disturbance?
- Are rock colours layered, with stains and highlights, not flat?
- Do transitions, rock to soil to plants, look gradual?
If you can answer “yes” to most of these, your N-scale mountains, valleys, and rock cuts will read as a coherent landscape, not a collection of scenic products. The result is the look Mountain and Valley N Scale Railroad aims for: dramatic terrain, believable engineering, and scenery that supports the story of trains working through rugged country.
Whisper to you next Saturday. Bye Cobber.